Hope you all had a great thanksgiving weekend! Amity and I ended up cooking dinner for two on Thursday, since we were headed to Charleston on Friday. Since two people can only eat so much in one day, we roasted a chicken instead of a turkey. Not that either of us seemed to miss dried turkey meat whatsoever.
I did want to do something different with the chicken this time to make it a bit more special. So I opted for a slow roast at 275F for about 3 hours. The results is crispy skin and fall off the bone meat that is juicy and tender. Pretty similar to a rotisserie chicken really. I still did everything else pretty much the same - air dried it for 24 hours, trussed it and seasoned it just before cooking (with salt, pepper, and rosemary in the cavity).
For sides, we went pretty traditional. Mashed potatoes, cranberry/orange relish, brussel sprouts/apples/bacon, chicken gravy, apple sauce, and of course - my favorite - a huge pan of stuffing! The stuffing was twice baked with day-old bread, roasted chestnuts, pecans, onions, carrots, celery, apples, and homemade bratwursts (made by Nate/Lisa/Haskell in VT). Before baking the stuffing (twice) I liberally soaked everything in homemade chicken stock, so that by the time we ate it, all the chickeny goodness was completely baked in. By far my favorite part of the meal.
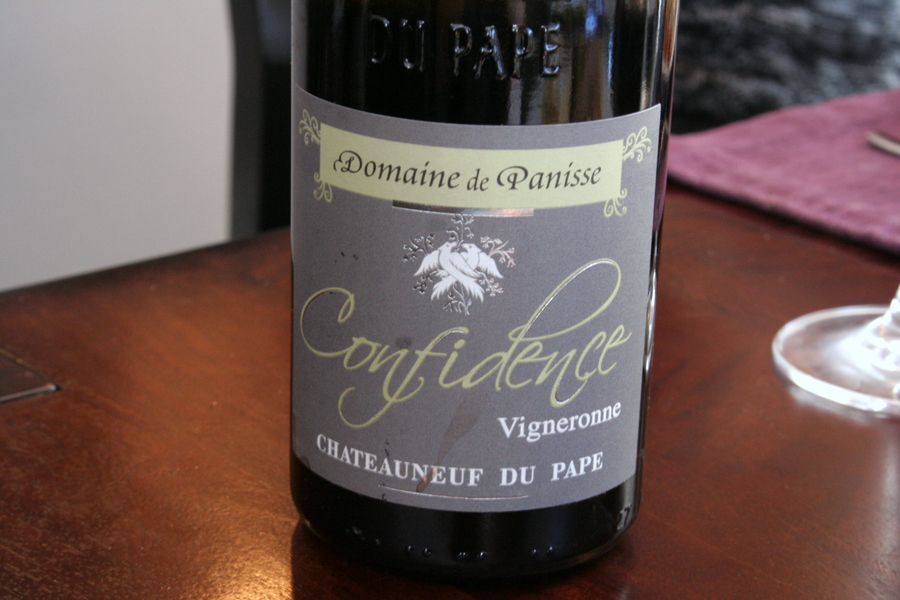
Along with all this delicious food, we had a great bottle of Chateauneuf du Pape that Amity had brought back from her trip to France 18 months ago. Perfect wine for a great meal!
Showing posts with label chicken. Show all posts
Nov 27, 2011
Jul 12, 2011
thai chicken basil
Sorry I haven't posted in a while. With the summer fully upon us, we've been feasting on a lot of tomatoes, salads and other cold meals throughout the week. Not very interesting stuff to blog about. I do however have a mini-garden on our very windy fifth floor balcony and among other things have a large bunch of Thai Basil growing. Since I hadn't used any of it yet, it was starting to get rather unruly. Gai Pad Gra Pow, or chicken (gai) stir fried (pad) with holy basil (gra pow), seemed like a good way to use some of it.
This dish can be found in just about any Thai restaurant all over the world. It's rather quick and simple to make and doesn't require a lot of ingredients. Usually this dish is made with ground chicken, but I used diced chicken thigh today. Turkey or pork would work well for this dish as well. Ideally the dish is made with Holy Basil, which is different from Thai Basil or regular Basil. It has more of a spicy, minty quality. Any basil will do in a pinch, but if you can find Holy Basil somewhere, all the better. The sauce is a simple mix of soy sauce, oyster sauce, and sugar dissolved in a bit of water. And don't forget the chilies! This dish is usually very spicy, but obviously you can adjust that to your tastes rather easily.
I fell in love with sticky rice in Thailand, and this seemed like a perfect time to make some. Unlike regular rice, you do need to soak the rice first (i usually soak it for 8-12 hours). Then you simply steam it for 20-25minutes minutes. Ideally I would have a special bamboo steamer, but I've found that my fine mesh strainer fits perfectly in my saucepan and works very well for this. The only trick is to keep the layer of rice a uniform thickness. You'll also want to buy special "sweet rice" for this (it's not actually sweet!). I use "Three Ladies" brand Sweet Rice. When cooked, the rice should stick together, but it'll be dry to the touch. Enjoy!
Gai Pad Gra Pow (Serves 2)
3/4 lb chicken, diced or ground
2 tsp cooking oil
4-5 cloves garlic, minced
2 tbls oyster sauce
2 tsp fish sauce
1 tsp sugar
2 thai birdseye chilies, minced (this should make it somewhat spicy, adjust to taste)
1 cup loosely packed Holy Basil
Instructions
Heat oil in frying pan until very hot
Add garlic and cook for 30 seconds, stirring continuously
Add chicken and cook 2-3 minutes until cooked through
Add oyster sauce, soy sauce, sugar and just enough water to thin it out a bit (1-2 tbls)
Add basil and chillies and serve immediately
Apr 11, 2011
adobo
Where can I possibly begin with Filipino chicken Adobo without offending anyone. Well, let's see... vinegar seems important. Other than that, you're on your own! Just about everyone I spoke to and every web site I consulted used a different list of ingredients. Some used pork, others chicken. Soy sauce is also a standard ingredient, but historically salt or fermented fish paste were more likely to be used (the Chinese brought soy sauce at some point). Some like it spicy, others sweet. The bottom line is that this is a dish made in just about every home on many of the Philippines' 7,000+ islands, and every cook has a slightly different take on the recipe. This sounds very much like pot au feu in France or apple pie in the US (minus the part about the islands).

Of course this makes cooking Adobo somewhat liberating, especially since I've never actually eaten Adobo before. No expectations or preconceptions to weigh me down. I'd read about my friend Lan's version on her blog, and the article from the New York Times on Adobo had some good insights. I could almost imagine what Adobo would taste like, but I wasn't restricted to any specific recipe.

One thing that caught my attention was the use of Coconut Sap Vinegar in a couple recipes I found. Since my my grocery store has an entire isle of Filipino products, this was actually quite easy to find - and rather inexpensive. Coconut Sap Vinegar, is exactly what it sounds like: fermented sap (not coconut water or milk) from the coconut tree. It's rather pungent, and is supposed to have a slight hint of coconut. I mostly just taste vinegar - similar to white wine vinegar (a good substitute). In the end it just seemed like a good excuse to try a new ingredient.

So the basic recipe goes something like this: Brown the chicken (dark meat please!), add your braising liquid and aromatics (vinegar, soy sauce, bay leaves, black pepper, garlic), and simmer until the chicken is tender ~ 45 minutes. The variations in the recipe come from the ratio of vinegar to soy sauce (I used 2:1) and the aromatics (I used star anise and cinnamon in addition to the ingredients listed above). As for the cooking technique, I essentially followed these directions for perfectly crisp skin - even after a 45minute braise.

The last thing that caught my attention was the use of bay leaves. The Californian and Mediterranean bay leaf commonly found in the US seemed like a weird ingredient to have in a Filipino dish. Wikipedia to the rescue! In fact, there are several types of bay leaves, including the Indonesian and Indian bay leaves, that have a mild cinnamon flavor. My guess, though I have not confirmed this anywhere, is that these are the types of bay leaves commonly found in the Philippines and used for Adobo. Of course, it's also entirely possible that the Spanish brought the Mediterranean bay leaf to the islands, in which case, regular bay leaves would work just fine. If someone could confirm what is typically available in the Philippines, I would greatly appreciate it! Anyway, as I mentioned I ended up adding a small piece of cinnamon bark to my Adobo, in an effort to approximate the taste of an Indian bay leaf. Probably not authentic, but this is my version! I served the chicken with rice and stir fried cabbage & peppers. Not pictured: a big bowl of the sauce we spooned all over our plates :)
Of course this makes cooking Adobo somewhat liberating, especially since I've never actually eaten Adobo before. No expectations or preconceptions to weigh me down. I'd read about my friend Lan's version on her blog, and the article from the New York Times on Adobo had some good insights. I could almost imagine what Adobo would taste like, but I wasn't restricted to any specific recipe.
One thing that caught my attention was the use of Coconut Sap Vinegar in a couple recipes I found. Since my my grocery store has an entire isle of Filipino products, this was actually quite easy to find - and rather inexpensive. Coconut Sap Vinegar, is exactly what it sounds like: fermented sap (not coconut water or milk) from the coconut tree. It's rather pungent, and is supposed to have a slight hint of coconut. I mostly just taste vinegar - similar to white wine vinegar (a good substitute). In the end it just seemed like a good excuse to try a new ingredient.
So the basic recipe goes something like this: Brown the chicken (dark meat please!), add your braising liquid and aromatics (vinegar, soy sauce, bay leaves, black pepper, garlic), and simmer until the chicken is tender ~ 45 minutes. The variations in the recipe come from the ratio of vinegar to soy sauce (I used 2:1) and the aromatics (I used star anise and cinnamon in addition to the ingredients listed above). As for the cooking technique, I essentially followed these directions for perfectly crisp skin - even after a 45minute braise.
The last thing that caught my attention was the use of bay leaves. The Californian and Mediterranean bay leaf commonly found in the US seemed like a weird ingredient to have in a Filipino dish. Wikipedia to the rescue! In fact, there are several types of bay leaves, including the Indonesian and Indian bay leaves, that have a mild cinnamon flavor. My guess, though I have not confirmed this anywhere, is that these are the types of bay leaves commonly found in the Philippines and used for Adobo. Of course, it's also entirely possible that the Spanish brought the Mediterranean bay leaf to the islands, in which case, regular bay leaves would work just fine. If someone could confirm what is typically available in the Philippines, I would greatly appreciate it! Anyway, as I mentioned I ended up adding a small piece of cinnamon bark to my Adobo, in an effort to approximate the taste of an Indian bay leaf. Probably not authentic, but this is my version! I served the chicken with rice and stir fried cabbage & peppers. Not pictured: a big bowl of the sauce we spooned all over our plates :)
Apr 5, 2011
fryers and roasters
Roast chicken is one of my favorite home cooked meals. As such, it makes a regular appearance at the dinner table -- and the blog. I'll take this opportunity to link a fantastic video of Thomas Keller demonstrating how to prepare a roasted chicken. Pretty cool having the most respected chef in the US show you how to truss a bird! Now if only I knew how to tie a slip-knot...
A few important things Keller doesn't discuss in this video. First, using a small "fryer" chicken is a far better idea than roasting a larger "roaster" chicken..Fryers are simply younger chickens. As a result they're smaller and more tender. They usually weigh three pounds, while roasters can weigh up six pounds or more. A fryer should be sufficient for a family of four. If you need to feed more people, just cook two fryers.
Second, drying the skin of the chicken before you cook it is a very good idea. Air drying in the fridge for a few hours before tempering the chicken is one option. If you don't have time for that, just make sure to really dry the exterior of the chicken with paper towels.
Finally, as with any meat that's not brined, salt it right before you cook it. If you salt too early (like when you first pull it out of the fridge), the salt will draw out the moisture from the meat. With a roast chicken, that will prevent you from achieving that perfect crisp skin and will result in a drier chicken. Boooo!!!
Mar 10, 2011
jerk
Needed a little change-up from all the Asian food lately, so we took a little trip to the Caribbean this week. I followed a pretty simple epicurious recipe for jerk chicken marinade. I did cut back on the scotch bonets and added ginger since that seemed appropriate. For the chicken I used a whole chicken I cut up, and let it marinade in the fridge overnight. Since it was kind of cold and wet outside the following day, I opted to cook the chicken in the oven instead of on the grill. Low and slow is the key here. The oven was set at 350 and I cooked the chicken pieces for a good 80-90 minutes, turning the oven down to 300 for the last 15-20 minutes. The result was very juicy and delicious chicken. As a side I cooked some plain rice and tossed with lime juice and cilantro. I also made black beans. The beans were soaked overnight and then cooked with a pablano pepper, a dried chipotle, a small onion, apple cider vinegar, cumin, and oregano in water for a couple hours until tender. Not exactly a side you'd find in Jamaica next to chicken (tasted more like a southwestern chili), but still delicious. Plus beans are one of those things that gets better with time, so the leftovers have been quite wonderful.
Feb 27, 2011
manjala
Amity's friend Ross was in town this weekend and Friday evening we decided to cook a meal at home rather than go out. So I put together an Indian mini-feast with food for at least ten people. Unfortunately (or perhaps fortunately) there were only three of us. On the menu: Paneer Tikka Massala, Chicken Vindaloo, Aloo Matar, fresh Naan, and Raita. The recipes primarily came from YouTube. Specifically, I've been watching videos from "Manjula's Kitchen," who specializes in Indian vegetarian food. While her video presentation skills are perhaps lacking a bit, her food looks and tastes authentic and her recipes are thorough. She has nearly 28,000 subscribers on YouTube along with a website where you can find all of the recipes she has been compiling over the last four years. In the end, this is an amazing resource for anyone interested in Indian and/or vegetarian cooking and the primary way I've been learning. More generally. I find that I use YouTube very frequently when I'm trying to learn a new technique or recipe these days. I'm sure there are plenty of great YouTube channels, so if anyone has good links, feel free to share in the comments sections!
Feb 26, 2011
yakitori
It amazes me that sushi and miso soup are the Japanese foods that made the successful trip across the Pacific some 40 years ago. Who exactly decided that raw fish and fermented soy bean soup would work in the US back then?? The Japanese have a cuisine that includes noodle soup, grilled fish, fried veggies, hot pot, steak, and my favorite -- chicken morsels bbq'd on skewers. Those would all seem like much more likely candidates to appeal to the American palette - especially back then.
Today I made my first attempt at yakitori, which essentially means chicken (tori) morsels, grilled over live coals (yaki) and basted with a sweet soy-based sauce. It's dead simple and of course delicious. I only made one type of yakitori today but usually when you have this in restaurants or as street food, you would likely order several different types. Typical varieties include dark meat, liver, gizzards, skin, small chicken wings, ground up chicken balls, green onions, peppers, mushrooms, and the list goes on. Today I made chicken with green onion, which is one of the more popular types. Though it's usually made with dark chicken meat, I had a chicken breast in the fridge, so I used that. The basting sauce recipe is very simple, and is included below. I scaled it down quite a bit since I only made four skewers this time. Just bring the ingredients to a boil and it's ready to use.
To make life simple, I used the broiler in the oven to cook the meat, flipping and basting every couple minutes. I would estimate it took no more than 10 minutes to cook the chicken all the way through.The result was good, though it certainly lacked that smokey grilled flavor and the little charred bits that you get when you use coals. Nevertheless, it's a great little appetizer that could easily be turned into a larger meal. Rumor has it that there are plans to make a little yakitori grill for our balcony... I'm sure you'll hear about it if that comes to be. As for the rest of the meal today... salmon nigiri and onigiri with kelp.
---------------------------------------------------
Simple Yakitori Sauce
Ingredients
12 Tbls Soy Sauce (3/4 cup)
6 Tbls Sake
3 Tbls Mirin
2 Tbls Sugar
makes about 1.5 cups yakitori sauce
Directions
Bring all the ingredients to a boil to dissolve sugar and to burn off the alcohol. Baste the skewers with the sauce while cooking over coals, or if you have enough sauce, dip the skewers into the sauce ever couple of minutes during the cooking.
Oct 2, 2010
caramel
satisfied with the lemongrass pork but craving more south-east asian flavors, i turned to a couple recipes that i've always enjoyed in the past. first up, chicken simmered in a caramel sauce. this is traditionally cooked in a clay pot, but works reasonably well in regular cookware. you start by making caramel sauce, a staple ingredient in vietnamese cooking. nothing crazy here, just sugar, water, and a watchful eye. you start with a cup of sugar and 1/4 cup of water, stirred for the first two minutes over medium low heat, and then left to cook for 20-30 minutes (depending on what you consider medium low). you're looking for your caramel to go from opaque to gold, orange, red and eventually a coffee/molasses color. at this point the caramel will be smoking a bit and you want to stop the cooking by lowering the pot into a sink full of water.
Once you've cooled your pot in water, add another 1/2 cup of water and reheat to disolve the caramel over a medium flame. the caramel will darken a bit more until you have a rather dark, slightly bitter (but not burnt!) flavor. poor into a container once cooled and use as necessary!
so... with caramel in hand, chicken simmered in caramel sauce is very easy. take about a pound of cut up boneless chicken thighs, and mix with a two inch knob of ginger, sliced thinly and bruised up with the back of the knife, one clove of garlic, two tablespoon of fish sauce and a tablespoon of water. Cook the whole thing in a covered pot for 10 minutes over a medium flame, take the lid off and cook for anther 5 minutes. let it rest a bit and serve! see easy :)
I also put together a little green mango salad. the green mango - available at your local asian market - can be cut up with a simple cheese grater or with a knife and veggie peeler. the dressing includes fish sauce (1.5 tbls), juice of lime (1), chili (1 serano), garlic (1 clove), agave syrup (1.5tbls) and small dried shrimp (1 tbls). add in some cherry tomatoes, couple green beans, and top off with some peanuts (the last two omitted today unfortunately) and you've got a pretty traditional thai green mango salad. yum!
Sep 15, 2010
vietnamese chicken stew
I've been watching "Luke's Vietnam" on the cooking channel, and besides desperately making me wanna go back for another visit, it also makes me crave Vietnamese food. one of the most traditional comfort foods in vietnam is bo kho - or beef stew. from what i understand, each household has a slightly different take on the recipe, but generally the stew includes tomatoes, onions, carrots, potatoes, star anise, lemongrass, fish sauce, Chinese five spice, brown sugar, ginger and cilantro. the protein is typically a tough hunk of beef that needs to be stewed a few hours to make it tender and delicious.
unfortunately i didn't have any beef or potatoes (or vietnamese baguettes that bo kho usually comes with), but instead found myself with a whole chicken. so i figured i'd change up the recipe a bit and give chicken a whirl. i adjusted the recipe by reducing cooking time (since chicken doesnt need as long to cook), reducing the water i added to the stew (since it wouldnt have as much time to reduce), and increasing the spices a bit (to make up for the lack of beefy flavor). the end result was full of flavor and certainly something i'd make again. it even reminded me just a little bit of eating in vietnam. if you want to give this dish a go, just look online for bo kho - there are tons of recipes out there!
Subscribe to:
Posts (Atom)